
By 2025, most new vehicles will have been integrated with electronic fuel injection systems (EFI), but carburetors will undoubtedly not have entirely vanished. From old classic motorcycles to off-road motorcycles and performance racing bikes, a lot of engines are still powered by carburetors. In an increasingly EFI-dominated world, properly jetting carburetors is essential among riders and tuners seeking smooth throttle response, improved economy, and dependable power.
This guide helps in understanding carburetor jets, tuning, working with tools such as a carburetor jet kit and cleaning tool, and ways to set up tuning for different motorcycle displacements and applications.
EFI vs Carburetors: Why Jets Still Count in 2025
The simplicity and ease of setting carburetors cannot be denied. Their operation is still understood clearly by factory-degreed mechanics. Many mechanics still trust the mechanical reliability of a well-tuned carburetor.
Carburetors, as opposed to EFI systems, are simply controlled by the rider via engine vacuum and fuel flow to achieve the right ratio. Therefore, this gives the rider better overall control over fuel delivery, allowing alteration of engine performance without using tools for electronic programming or remapping.
Carburetors have an easy and big role in vintage motorcycles, dirt bikes, and far-off applications, where EFI diagnostics become unworkable. In racing, some tuners still prefer the raw feel and direct adjustability of carburetors.
The Anatomy of Carburetor Jets
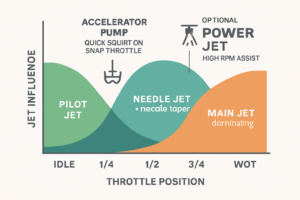
Understanding the various jets in a carburetor is the first step toward jetting mastery. Each jet feeds fuel under different throttle positions.
Main Jet vs. Pilot Jet vs. Needle Jet
Carburetor pilot jet controls the fuel flow during idle and very low throttle, whereby the engine is only ticking over. Needle jet carburetor, along with their respective needles, control fuel delivery from around 1/4 to 3/4 throttle, where most of the riding actually occurs. The main jet controls fuel delivery to wide-open-throttle conditions, which affects the maximum power.
These jets sit within different areas of the carburetor. The adjustment of each of these will allow tuning for rich or lean running of the engine at one particular throttle range. Incorrect jetting can cause sluggish response, misfires, or, in some severe cases, engine destruction.
Accelerator Pump & Power Jet
To aid throttle response, some carburetors are equipped with an accelerator pump to deliver a quick squirt of fuel when the throttle is suddenly opened.
High-performance carburetors might have a power jet as well. This extra circuit sometimes helps fine-tune fuel delivery at high RPMs, particularly for racing engines that will be operated wide open for extended periods.
When & Why to Jet Your Carburetor
It is key to know when to re-jett. An engine running too rich (too much fuel) will leave black soot on the spark plug, have a rough idle, and produce oily smoke. A lean mix (too little fuel) translates to white or blistered plugs, engine knock, or overheating.
The parameters affecting the density of air, and thus the air-fuel mixture, are altitude, temperature, and humidity. Hence, a bike jetted for sea level may currently be running lean in the mountains. Similarly, a tune set cold in the winter months may be way too rich when experienced in hot summer months.
Other modifications that require re-jetting include the installation of a free-flowing exhaust or a high-performance air filter. These modifications increase airflow, so for the right ratio, more fuel is needed.
Step-by-Step Jetting Process
Jetting can seem overwhelming; however, with a systematic approach, it can be simplified into a straightforward process. Always work on one change at a time and note each change along the way.
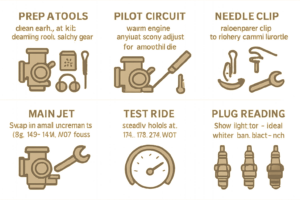
Preparation and Tools
Clean your carburetor properly, using a carburetor jet cleaning tool. You will need an appropriate jet kit to match your carburetor type, small drill bits or reamers, a flat screwdriver, and a clear, well-lit workspace.
Be fussy, and remember to wear gloves and eye protection when working with fuel. Label the parts and the jets as you remove them, so they won’t be confusing when you reassemble the carburetor later.
Adjusting the Pilot Jet
Start your jetting procedure with the pilot jet carburetor, which controls idle and low-speed performance of your rig. The engine should be warm to begin adjusting; the air screw will be turned in or out, listening for the engine’s response, until you achieve smooth, steady idling.
In general, screw in tends to richen the mixture, and screw out tends to lean it. Fine-tune until you reach the highest idle speed, then back off the idle screw a little bit.
Needle Jet Adjustment & Clip Setting
Next, work on the needle jet. This jet and its needle control the mid-throttle range, which covers most normal riding.
The needle is located inside the clip. Lowering the clip raises the needle, hence making the mixture richer. Raising it lowers the needle, making it leaner. Test it while riding in second or third gear with steady middle motorized throttle to judge over bumpiness or surging.
For smaller-displacement motorbikes, such as those with 50 cc к 150 куб. см engines, needle sensitivity increases, requiring leaner midrange jetting to achieve better economy. Heavy motorcycles, such as those with engines of 250 cc or more, often require richer needle settings to maintain torque under load.
Replacing the Main Jet
Peak horsepower is produced under wide-open throttle with the main jet controlling that fuel delivery. Used a screwdriver to swap out the main jet. Always go up or down in small increments, such as 140 to 145.
Test it out on a deserted road or track by going full throttle in a high gear. If the engine chokes or stumbles, it is too rich. If it gushes, overheats, or loses power, it is too lean. Make adjustments and test again.
Finishing Testing & Plug Reading
Finalising the jetting of the carburettor and optimising engine performance by combustion comparisons across all throttle ranges using the colour of the spark plug as a diagnostic to determine which combustion characteristics are present.
1. Test Ride Procedure
Warm the engine up to its normal operating temperature.
Make sure that an appropriate heat range spark plug for the application is installed (OEM recommended).
Replace with a completely new or freshly cleaned spark plug.
Run the motorcycle through all throttle ranges :
Idle
- 1/4 throttle
- 1/2 throttle
- 3/4 throttle
Wide open throttle (WOT)
Hold for 10-15 seconds at each throttle position under load.
Immediately kill the engine after the WOT run with the kill switch or by cutting the ignition (not the key) to preserve plug condition.
Coast to a stop and take out the plug for inspection.
2. Spark Plug Inspection Method
Remove the plug by using a plug wrench once the engine cools off a bit.
Use a magnifying glass as appropriate to inspect center ceramic insulator and electrode tip.
Colour Interpretation:
Light Tan/Light Brown: Ideal mixture and healthy combustion.
White/Greyish Tip: Lean condition (not enough fuel).
Black/Fouled: Rich (high fuel, weak ignition).

3. For Documentation of Future Tuning
Record the following parameters:
- Jet sizes (Main, Pilot, Needle clip position)
- Air/fuel screw position (turns out from seated)
- Altitude
- Ambient temperature & humidity
- Plug brand and model
Keep a logbook or spreadsheet with date-stamped entries to compare settings for seasonal and altitude-based adjustments.
Cleaning & Maintenance of Carburetor Jets
How to clean carburetor jets? This may be one of the most common carburetor problems: dirt or clogged jets. Regular cleaning will keep the engine running smoothly.
It uses a carburetor main jet cleaning set with wires and brushes. The best technique is never to push a wire through a jet; it may damage or enlarge the hole, thereby changing its flow rate. Use compressed air to blow out any debris.
Prevent problems by cleaning the fuel; fit a fuel filter; do not leave the bike for too long with untreated fuel. For those who ride bikes every day, the carburetor needs cleaning at least once a season, while for those who race or usually ride on dusty trails, it’s necessary to clean them regularly.
Advanced Jetting Strategies
High-performance tuning goes beyond basic jet changes. You also need to consider weather conditions, engine mods, and riding purpose.
Most jet kits come with an altitude and temperature, and carburetor jetting chart to help smooth the jetting process. For instance, Dynojet says that you should reduce your main jet by one size for every 2,000 feet above sea level. Fuel should increase in cold air, since denser air leans out the mix.
Custom-made systems for after-market elevation compensation are also available. Riders who ride in continents with very high altitude changes may prefer the use of adjustable air screws or dual-jet systems for quick changes.
Racing vs. Daily
However, for everyday ride, the focus is on smooth throttle, fuel economy, and engine longevity. Fuel should lean a bit towards stability and reliability. But really, aggressive racing bikes are tuned that way. Power jets, custom needles, and huge mains are usually in those cases.
These engines run richer for the very short bursts of high RPM, with a little less concern for wear or fuel use.
The setup for the trail bike used daily, which has a 250cc engine, is a total difference from a 450 куб.см motocross engine built for competition. While the first requires very conservative and balanced jetting, the second demands maximum power, along with constant changes in track conditions and weather.
What Carburetor Jetting Support Does BSEMotor Provide?
BSEMotor brings you all home tuners and professionals to jet like professionals. Do you have questions regarding tuning or procuring parts for your workshop or dealership? Our team provides technical consulting, bulk ordering, and OEM-level customization for race teams and small businesses.
Часто задаваемые вопросы
What size pilot jet should I use?
For 50-150 ccs, use a smaller pilot (around 35-45). For 250-450, pilots will usually range from 45-55, depending on mods and weather.
How often should I clean jets?
For daily riders, they need to clean their jets once in 6 months. While for racers or in dusty areas, every 3-5 rides is usually enough to keep the jets clean.
Can you jet for altitude?
Yes. You can use altitude charts and drop 1-2 sizes of your main jet, depending on altitude, and adjust the air screw.
Should I change over to EFI?
Only if you think you need auto-tuning/if you have access to tuning tools. Otherwise, carburetors still have great control and simplicity for many users.
Jet Right, Ride Better
In fact, jetting a carburetor is a little old-fashioned, but it remains one of the most effective ways to increase power performance and improve fuel economy. Whether you’re restoring a vintage bike or preparing a race machine, you can benefit from knowing how to jet properly. It is one of the keys to a smoother ride and longer engine life.
With the best tools and through a systematic approach to tuning, anyone can really understand carb tuning. Browse our catalog, contact our B2B team for bulk pricing, and check out more tuning tips on our blog.