
Dirt bike suspension settings are the secret to dirt bike performance, whether it’s an moto de cross eléctrica or a simple one. Unfortunately, it is still ignored by most riders and mechanics. The proper suspension setup can alter the handling of a bike. For enthusiasts who wish to enhance control, racers who wish to enhance lap time, and dealers who wish to enhance customer satisfaction, understanding the suspension system is important. This article provides a straightforward approach to understanding, installing, and adjusting suspension for optimal performance and longevity.
Why Dirt Bike Suspension Settings are Important on a Dirt Bike
Suspension is not just a component; it’s a link from the ground to the rider. Incorrect setup decreases performance, affects the rider, and increases fatigue.
What Happens With an Improper Suspension Setup
If the dirt bike suspension settings become too stiff, uneven, or too soft, this will adversely affect the braking, cornering, and landing performance of the dirt bike. This creates physical fatigue and technical issues. Sag and damping parameter misalignment tend to produce physically exhausting and unpredictable handling.
Benefits of Accurate Dirt Bike Suspension Adjustments
The advantages of a correctly set up suspension are:
- Increased balance and weight transfer due to jumps and corners
- Reduced effort for the rider, especially in long or complex situations
These improvements not only lead to a quicker bike but also contribute to increased comfort and confidence of the rider.
Know Before You Adjust Suspension on a Dirt Bike – Diagnose Your Current Suspension State
You can’t diagnose your current suspension state until you observe how the setup performs while riding. There are different types of dirt bikes. Ensure you learn the correct kind of dirt bike you own. Observation, feedback, and progressive testing are the key components of any effective suspension analysis.
Signs That Your Suspension Needs Adjustment
If confronted with complaints about stability, traction, or chassis feel, adjustments are required. Excessive front dive during braking or rear-end instability during acceleration generally indicates that compression or rebound damping is out of balance. You can experience harsh feedback via the handlebars or foot pegs. This can happen when equipment is set up incorrectly or poorly.
Test Rides and Logging Feedback
Test rides should be conducted on terrain that best simulates the conditions where the dirt bike will be ridden. Accelerate and decelerate smoothly. Diagnose your current suspension state by observing how the dirt bike responds to braking, acceleration, bumps, and landing. Keep a written log, including settings and terrain conditions. Don’t slack off between tests; things only make sense with consistent observation.
Understanding the Basics of Dirt Bike Suspension
Bicicleta sucia suspension consists of a set of components functioning together. Their main function is to absorb energy, create traction, and control weight transfer. A conceptual framework within the system offers intentional adjustment instead of trial and error.
Main Components of Dirt Bike Suspension
The front fork is generally composed of damping and spring elements. It absorbs much of the shock on landings and impacts. The rear shock receives support from a swingarm and typically a linkage system. It gives resistance and rebound control when the rear compresses. Some models provide independent control of high-speed and low-speed damping.
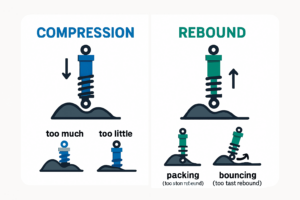
Suspension terminologies might sound space-age, but there is good logic to it. Sag is the amount of compression in the suspension under load. This is static sag, the bike’s sag, and rider sag, with the rider on the bike. Preload is loading the spring before taking it for a ride. Damping opposes motion. It controls how force is introduced in compression and rebound.
Dirt Bike Suspension Setup Guide
Accurate Dirt Bike Suspension should follow a clear order. Start with sag, then finish by fine-tuning based on feedback. Let’s see dirt bike suspension tuning guide step-by-step:
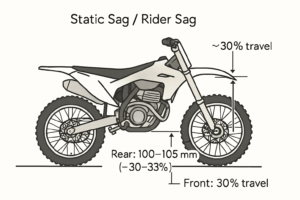
Step 1: Rider Sag Setting
Begin by taking static and sag rider measurements using a measuring tape or sag gauge. Ideal dirt bike rear shock adjustment target readings are 100–105 mm, which corresponds to approximately 30–33 percent of the total travel. For the dirt bike front fork adjustment, aim for approximately 30 percent of the total travel. These will keep the suspension at the right height when loaded. Adjust the spring preload according to the rider’s weight, including full gear.
Step 2: Adjusting Rear Shock On Dirt Bike
For adjusting the rear shock on a dirt bike, set the spring preload first to compensate for sag. Then, set compression and rebound adjustment. Compression adjustment controls the rate at which the shock is compressed under load. The rebound setting controls how rapidly the shock returns to its extended state after being compressed. They must be balanced so as not to cause “packing” (too slow) or bouncing (too rapid).
Step 3: Front Fork Adjustment
The front fork will most often include a compression clicker and a rebound adjustment. Coil-spring forks use preload for mechanical adjustment. In contrast, air forks rely on internal pressure settings. Make choices based on your preference and track conditions.
Step 4: Use a Dirt Bike Suspension Tuning Chart
A dirt bike suspension tuning chart is valuable for normalizing your baseline. Take measurements of sag, clicker positions, and behavior under different conditions. Avoid making arbitrary changes; instead, take small steps and systematically record the results.
Suspension Tuning Guide for Various Riding Styles & Terrains
The suspension never works with a single, universal dirt bike suspension setup guide. Riding style, discipline, and terrain all influence the best settings. Understanding how these conditions work enables you to make informed decisions about damping, preload, and tire pressure adjustments.
Trail Riding vs. Motocross vs. Enduro
Trail riding is best suited for softer conditions that absorb slow-speed bumps. Motocross needs firmer compression damping and quicker rebound. This helps manage jumps and fast changes in speed. Enduro riders may prefer an in-between setup that can handle technical, slow-speed terrain and hard bursts.
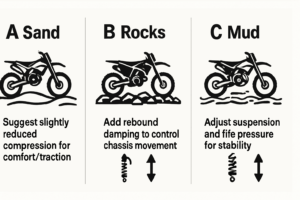
Terrain-Based Adjustments
Each surface has its own suspension requirements. With sand, reduce compression slightly for additional comfort and traction. On rocks, add rebound damping to manage chassis movement. Mud requires adjusting the suspension and tire pressure. This helps maintain stability and control when the wheels spin.
Advanced Suspension Tuning Tips
Advanced tuning needs more than just changing parts. For this, you must know the difference between the suspension geometry, the dirt bike rider’s weight, and the normal mechanical state of your dirt bike.
Common Mistakes to Avoid
Standard suspension tuning mistakes include over-adjusting or improper suspension setup without checking and ignoring rider weight. It’s also a mistake to think factory specs suit every rider or situation. Always consider the spring rate, damping rates, and whether the internal valving meets your needs.
When to Get a Professional Suspension Revalve
If bottoming out continues, even after adjusting sag and clickers, it may be time to replace the valve. This is especially true if the factory valving doesn’t match your riding style. Consider visiting a shop for help. Shops with expertise can change internal shim stacks and springs. They utilize dyno tuning and rider input to achieve better results. These treatments offer a degree of precision that is difficult to achieve with tools.
Tools You Need for Suspension Setup
Suspension tuning does not require expensive tools, but specific and high-quality tools are necessary for optimal performance.
Essential Tools
● Measuring tape or sag gauge to take ride height measurements
● Clicker tuning screwdriver and general toolkit for fork/shock adjustments
Optional But Useful Equipment
Professional tuners might use fork bleeder valves and set up records, either on paper or via an app. In shop settings, they often test performance with a shock dyno.
Take Control of Your Ride
Suspension tuning is not just a matter of comfort; it is directly related to your dirt bike’s performance, safety and durability. If a dirt bike is properly tuned, it will show the best performance as it is supposed to be, like it will handle bumps better and preserve energy. Riders who know and control their setup ride better with conviction and intent. If you run a dealership or service a rider customer base, access to proper tuning expertise and equipment illustrates technical proficiency and fosters confidence.
Business Solutions – BSEMotors Deals for Dealers & Distributors
Suspension tuning is not just a rider issue; it is a business strategy. It helps to develop better products, raise customer satisfaction, and offer more value to dealers and distributors after sales. BSEMotor offers factory-tuned dirt bikes with suspension setups tailored to the intended purpose and rider class of each model. Spec sheets, setup instructions, and model-specific advice are provided to wholesale buyers. These documents simplify servicing and operating effective sales operations.
Preguntas frecuentes
What is the best setup for beginners?
An even, balanced, and slightly softer suspension enables beginners to stay in control and pick up ground feedback without being overwhelmed.
How frequently does suspension need to be adjusted?
Adjustments need to be made after significant terrain changes, weight changes in rider gear, or after any crash or service that could have affected mechanical items.
Can I tune the suspension at home?
Yes, if you have the right tools at hand, patience for testing, and a way to measure change. Tinkering in small increments gives more reliable results.
How does rider weight influence setup?
Rider weight directly controls spring compression and rebound. For example, if the rider has a high weight, then it is advisable to use stiffer springs or greater preload to achieve optimal sag.
What if my dirt bike still doesn’t feel right after tuning?
Recurring problems usually indicate internal inspection or professional review is in order. Factory settings may not be sufficient for specialty conditions or specific rider requirements.